Thursday, November 19, 2015

When Life Prevents you from Blogging

I am just stopping by for a moment to say hi! And to let you all know that it will be probably mid-December until I'll be back due to work constraints and giant sewing projects. Here to tide you over are some Marine Ball pictures. 


Until we meet again, happy sewing!

Monday, October 12, 2015

Almost there!

Just a quick check in!  Two weeks of traveling for work have slowed my jacket making process. 
In the intervening time, I got lucky in that Seamwork magazine released a vest pattern, which combined with a Burda Style suit jacket pattern, finally got me to a workable pattern. Here is the muslin with the new pattern. The only change is about a half inch in the shoulders.
And here is where I am at. Almost there. Just need to attach the lining, sleeve cuffs, hem band, and collar. Well and snaps. Luckily Wednesday is also a holiday, so hopefully he can wear his jacket this week. It's already weather for it. Alright, back to work!  Until next time happy sewing. 

Friday, September 25, 2015

Pattern Review Sewing Bee- Round 2 Final Project

Why hello there.  This is going to be another short post about the Pattern Review Sewing Bee, round 2.  My top was enough to advance to round 3, so I'm kind of meh about writing about it.  That and I'm kind of meh anyway, I think from all the food I've eaten this week.  So I'll let the pictures do the work.  I'll be next week, with work on my dear husband's leather jacket.  Just have to make it back to Ukraine.  Until next time, happy sewing!

From the front

the back


From the side

The beginning fabric and all the embellishments

Inside- look at all that hand finishing


P.S.  Happy 100th post to me!

Monday, September 14, 2015

Sewing Bee Round Two -- Embellished Fabric

So I made it to round two of the sewing bee on Pattern Review.  We now have 10 days to create an garment out of embellished fabric.  Meaning, you take a piece of fabric and you paint, embroider, quilt, dye, or change it in some way.  Originally I was thinking about making an Ukrainian style shirt, which is called a vyshyvanka, as they are usually heavily embroidered.  There were two faults with this idea, the silk I am using is too flimsy for that amount of embroidery, and I couldn't find a suitable .pdf pattern. 
This is the base fabric.  It is a washed silk.  The color is a little off in this picture, it is more green than blue.  I decided to simplify the garment part, to showcase the embellishment.  I remembered that about two years ago, I made a shirt out of By Hand London's Anna dress.  I decided this would be perfect- with the addition of a button placket.  Now for the design...

I knew that I wanted to do poppies, as the red looks awesome against the green, but I needed more than just painting/drawing flowers if I wanted to move on to round three.  I am aiming for the big prize a smaller Bernina.  (I would like a second machine so I don't have to change thread as much while say topstitching and it would be awesome to not have to buy one.)  So I was thinking in my arsenal of fabric design and I remembered this:

 Pinstripes!  I absolutely love pinstripes.  Many years ago, I took a shibori class and learned the art of Japanese tie-dying.  I really enjoyed the class, but I never wanted my folds to be haphazard, so I figured out how to make fairly even folds and then dye just the edges to make a stripe. I thought if I used a darker green it would simulate the stems of the poppies.


Here is how you make the pinstripes. First you decide how far apart you want the pinstripes, I decided on one inch.  I then used two strips of masking tape to mark the one inch.  Next time, I'll clear off my sewing table and use that for the ironing.  It was a little bit difficult to keep the fabric from slipping.  I did move my ironing board into the living room so I could hang out with the kiddos while working.  So you fold the fabric like an accordion, between the two pieces of tape.  Try your best to keep them even.  
 You'll end up an inch wide stack of fabric, now take some white thread and baste through all the layers.  As it's silk, it wasn't hard to do.  Then mix your dye or paint.  As the only fabric dyes I have are blue, I decided to use Lumiere and Neopaque fabric paints and water it down.  I used equal parts royal blue, yellow, and gold.  Add some water, I think I added the same amount of water as paint.  I used one of my son's baby food containers, so I could save the leftovers.
Now paint one side, trying to just keep to the edges of the folds.  This is why you want it to be even, so it is easier to paint just the edges.  It's not going to be perfect.  I painted one side of each piece, waited a couple minutes and then painted the other side.
This is what it should look like when done.  Now wait 24 hours, and then set the paint/dye how the manufacture suggests.  For the Lumiere/Neopaque it says to use an iron on the wrong side (I think for three minutes).  It also says you can heat it in the dryer for 45 minutes on the hottest setting your fabric will handle.  I will likely do that, as the pieces are larger, and I am pressed for time.  Tomorrow, I will paint the flowers.  I think that I might use my new Inktense pigments, which are set with just water!  Anyway, I will decide tomorrow, but now I must draw some poppies for the buttons.  Yup, I am even making my own buttons.

Don't worry though, I am also working on husband's birthday present.  Muslin 1 is done and fitted.  The size 40 was as feared, two sizes too big.  However, it was evenly two sizes too big- except for the arms, which were ridiculously long.  Who knew that my husband was secretly a t-rex.  Until next time happy sewing.

Saturday, September 12, 2015

Husband's Birthday Jacket, Round 1, Pattern Found

After hunting high and low on the internet, I finally found a non-oversized men's jacket pattern.  One that is meant to be a motorcycle jacket to boot.  I am just stopping by to leave the link to it, because it's a free pattern from Mannaquim, a Brazilian pattern company.  But if you go to the Mannaquim website, it is no longer there.  However, you can find it here.  It is almost spot on to my husband's inspiration photos.  The only downside is you have to trace it, and the instructions are in Portuguese.  I am almost done with the tracing- so hopefully tomorrow I'll cut out a muslin. 

He's wanting something similar to this, but in brown.

 or this

https://s-media-cache-ak0.pinimg.com/736x/4e/f9/d3/4ef9d342f2b92bb614f4c73af68c0e3c.jpg
And this is the pattern: 

So it's pretty close, right?  Hopefully it will fit without too much adjustment.  I am hoping it will run small to size.  My husband normally wears a 36 in coats.  Wish me luck! 

P.S.  I am also working on a brown skirt to match a brown jacket I made last spring.  So I am working through making my basics.  Until next time, happy sewing.

Friday, September 11, 2015

Finished Suit- Burda Shrunken Jacket + Single Seam Pencil Skirt

A couple days later than expected- I finally finished my latest project.  I've come to realize that I need some basics in my life, not everything I make should either be brightly colored or patterned.  I need items to go with those!  My biggest problem, though, is never being motivated to sew the plainer items.  I am glad I stuck this one out, because I really like the final suit, even if it is a plain grey suit.
For the jacket, I used Burda's shrunken jacket, I would give you the Burda Magazine it's from, but in the U.S. version they make you go to the website to download it!  Luckily, I had an older Russian Burda that had the pattern included with the magazine.  I made a straight size 38.  I worried that it might be a tiny bit snug in the bust, so the front bust is sewn at 3/8" instead of 5/8".  Next time I will not do this, as it's a tiny big big now in the bust.  Lesson learned- muslin the pattern.  I narrowed the shoulder 5/8" with a dart, and dropped the shoulder 1/2" so I didn't have to use shoulder pads.  
The skirt is the same pencil skirt as my two quilted pencils skirts made earlier this summer.  One difference though- I redrafted it taking out two solid inches.  I figured that zero ease/negative ease would make the skirt more flattering as the fabric I used is a very stretchy wool, I would call it wool knit, but there is still some structure to it. I think it just has some lycra in it.  I didn't put in a zipper as there was enough stretch to get it on, but I probably should have, it takes some work to get on.  I got the wool from the fabric store in Lawrence, Kansas- so at least that splurge didn't end up as stash. 
Can I be honest, I think this is one of the most flattering side views of me in a long time.  I hate looking at pictures of me from the side.  From February 2014 until July 2015 (so pretty much the span of my blog), I put on about 17 pounds.  Some of it was due to the toxoplasmosis- I was too tired to do much, some of it was a medication I was on, but most of it was eating not so well.  This was on top of the baby weight I hadn't lost yet, so I was up about 25 pounds.  Looking at myself from the front or the back, I still looked okay in my mind, but you could really tell that I had gained weight from the side.  In early July, I decided to get serious about losing the excess weight, as I had my U.S. vacation coming up, and if I didn't do something I would add another 5-10 pounds.  I upped my yoga, added some weight training, started running/walking, and stopped driving to work.  And I also really started to watch what I eat- I've been using the loseit app to track my calories.  Before my vacation, I lost five pounds.  I didn't lose any on vacation, and since then I've lost another seven pounds.  This picture really shows off the work I have put in.  I still have some ways to go, as I don't want to over do it (I've had to cut out running for a bit due to terrible shinsplints).  But, I am starting to feel better about how I look.
I think feeling bad about my body was one of the reasons that my blogging about my sewing has dropped off over the last couple of months.  It's hard to write about clothing, when all you can see in the pictures are your flaws.  And that you have a queue of 'boring basics' to sew. 
However, this 'boring basic' suit has a secret.  And that secret makes me super happy every time I think about it.  Plus it feels super lux to wear it.
I had no suitable stretch lining in my stash (as in I didn't have any stretch lining), so I remembered this crazy stretch silk charmeuse at the fabric store down the street.  Yes, I bought 1.6 more meters of fabric this month, and yes those are purple chili peppers.  But that is how I got (forced) myself to finish this suit.  I loooooove this lining!

A closer look at the chili peppers.  And yes, I lined the skirt with it as well.  Even though today, I looked very conservative at work, at least I knew I had chili peppers underneath it all.  Which made me feel better about wearing a dark suit in a sea of dark suits.
I used purple bias binding to finish the edges of the facings for the jacket and for the hem of skirt.  It makes my jacket look very professionally done.  Even if my hand stitches are never the same size.  Anyone have suggestions on how to improve that skill?
One last note on this jacket, it was almost a goner when I got to the collar.  This was the first jacket I have made where there is a collar stand.  And the directions made zero sense (either in English or Russian).  I was stumped.  However, I bought several Burda paper men's suit patterns, and luckily one of them had diagrams for the collar.  Thank god!  I think it's an interesting touch.  Speaking of men's patterns, my next project is my husband's leather jacket.  I found a Kwik Sew jean jacket pattern, that with a lot of slimming it up has the right style lines for the motorcycle jacket he wants.  I have searched for three months for one, and they do not exist.  Insane right? 

Catherine Zeta Jones' Jenny Packham Embellished Gown
Image found here

 I am going to leave you with what I have decided on as my inspiration for my marine ball dress.  I am so excited for it!  It will be a lot of work, but it's going to be stunnnnnnnning!  It will be silver with white, so it will be pinstriped!!!! I just bought 150 yards of strung clear sequins, and will be buying a sequin foot when I'm in the states in two weeks.  Yes they make them, and I am not ashamed to be buying one.  Anyway, I think that is all I have to say, so until next time happy sewing.


Tuesday, September 8, 2015

Need Inspiration for Marine Ballgown

Wow!  No posts for six weeks and then two in a row.  It's either feast or famine here.  I had totally meant to be finishing my blazer tonight, but I got stuck at work for an extra 2.5 hours.  Being already tired, I didn't want to risk it. So thinking about sewing it is.  I have been trying to figure out my Marine ballgown for this year.  In April, I bought this gorgeous art deco beaded lace from a Fashionable Stitch.  Such a bummer that Sunni decided to close down her shop, but completely understandable.

 It is stunning in real life.  It is 52" wide, and I was only able to buy two yards of it.  As it's white, that limits my options, so I've been pondering the underlay for what five months?  Well, today I found what is hopefully the perfect choice.  It's this silk faille from Gorgeous Fabrics, gotten on sale.  It is silver, so it should keep me from looking like a bride.


 So dear readers, how should I marry the two together?  I have loads (6) of yardage of the silk to make up for the limited lace.  My original plans were this dress (without the weird ruching details):

McCall's 7154
But how to utilize the lace?  So many questions, so I am turning to you readers.  In the comments, let me know what your ideas would be.  Link a picture, post a picture, sketch.  I have about a month before I have to get cracking on this one, with finishing the blazer, and making my husband's leather jacket.  So there is time!

Until next time, happy sewing!

Monday, September 7, 2015

Pattern Review Sewing Bee Round 1 - Fitted Blouse

So nothing like a contest to finally get me back into sewing.  I decided to enter Pattern Review's Sewing Bee, even though chances are I won't make it past round one.  But whatever, it finally got me out of my sewing funk, and I finished a project.  Actually, so far two, but I'm trying to finish up the third to post the second and third.  This is the blouse that I made for the contest.  Whilst on vacation, I was a bad girl and bought tons of fabrics.  But luckily, they aren't sitting around in my stash, but getting made! 

So, I am going to be lame and insert the pattern review, as I need to finish up my third item, so I can wear it all tomorrow. But you can see part of the second item in these pictures, as it's a new stretchy gray wool skirt.


Pattern or style used and how it fits the criteria: 
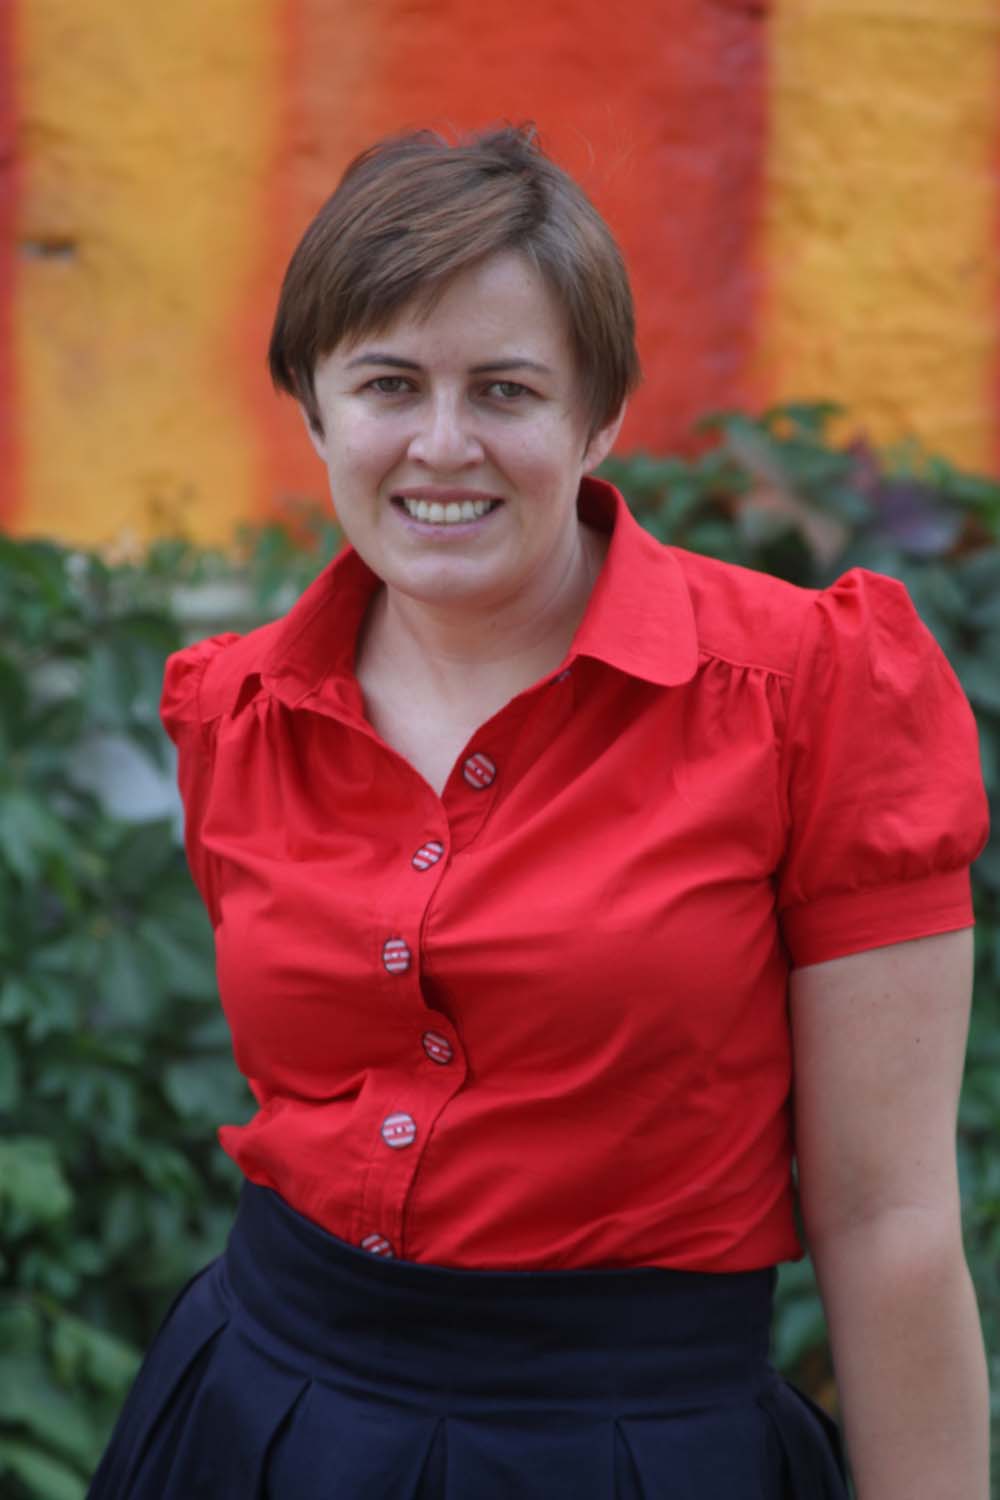
I used McCall's 6649 Laura Ashley blouse pattern with New Look 6078 sleeves. It is a button up blouse with set in sleeves. As you can tell by the pictures the pattern has been heavily modified! In order to get the secretarial look I was going for, I first extended the yoke into the front piece by two inches. I then rotated the side front bust dart into the shoulder (as I made the D cup, this is a substantial dart!), and used gathers instead of the dart. I left out the dart below the bust, to accommodate my slight stomach. The back darts and the curved side seams also help with making this a form fitting blouse. I also added two inches in the hips. Instead of the collar + collar stand, I made a tie.

Fabric Used-Material Content and Yardage: I used a plaid silk charmeuse bought on my vacation to San Francisco, I used almost 3 yards of it due to cutting several of the pieces on the bias.

Describe your closure: I used black pearl like buttons for the closures. Eight on the front placket and two on each sleeve cuff.

Describe the other components you used (e.g. buttons, collar, sleeve type, trim, pockets, contrast, etc): Instead of a traditional shirt collar, I made the more secretarial tie collar. This works well with the drape of the fabric. I made the sleeves bracelet length, as I have learned over the years that even if my sleeves are full length, I roll them up during the day. Rolled sleeves would have not worked with the fluidity of the fabric. I kept the continuous placket from the McCalls sleeve. I also widened the cuff about an inch. I used french seams to keep the inside looking nice.

Describe the fitting technique(s) you used to achieve shaping: The shaping is created by the shoulder gathers in the front (as I rotated the bust dart to the shoulder), the curved side seams, and the darts in the back. I added width to the hip, and took out width in the shoulder

Indicate here that you included the photos required - Remember that the Front and Back photos MUST be on a live model (although head may be omitted/obscured) and blog links are NOT allowed:
1. Front [Required]: yes
2. Back [Required]: yes
3. Inside detail [Required]: front with back in mirror
4. [Optional]: side
5. [Optional]: on mannequin to see details.

Describe what you like most about this blouse: I love how easy this blouse feels. It doesn't wrinkle, so it will wear well during the work day. The bow tie collar adds a layer of femininity that is often lost when wearing button downs.

Describe your biggest challenge in creating this blouse: The fabric! It is the shiftiest fabric I have ever sewn, and I've sewn quite a lot.

What other information would you like to share about this blouse and your process? Glue sticks really make a difference in making button downs!


 And I'll leave you guys with a sneak peak of probably the awesomest fabric I have ever bought. It's a stretch silk satin, and look at those chili peppers!  It's the lining to the skirt and the jacket.  I'll show it off properly when I finish the never ending jacket!  Until next time, happy sewing.

Friday, July 31, 2015

A Gabriola, Vacation, and a Giveaway

I am going to keep this short and sweet because I am using my phone to type this and I am terrible at ' swiping'. Currently, I am sitting in a cabin on the edge of Yosemite waiting for the husband to get ready so we can see the park. We've been in California since monday night, and beside the heat its been lovely. This is the first time he and I have traveled without the kids, since well before the little one came along ( long weekend in Chicago) or way back when we were dating a week in Hawaii. As we had to travel just to get to our wedding (from Moscow to kansas city) we didn't do a honeymoon. So five years later, we finally got one. We go back to KC tomorrow and continue our vacation there with the kids. I also get to make it to DC for some training before we head back to Kyiv. But you're not here for that, so let's get to the skirt. It was my last project before heading out.
I finally made Sewaholic's Gabriola after having the pattern in my stash for over a year. The fabric is a linen bought at JoAnn's during one our stops in KC in the last couple of years. I think fall 2013. I made a size ten. It grew, so I took several inches out of the sides. 
Once done, I tried it on and it was still too big. The waistband was already topstitched, and I had run out ofthe turquoise thread, so I had to put in darts. They are at the side seams, so they aren't noticeable, I hope. 
Other than that it was a super straight forward make. The only change for next time would be to interface the chevron pieces, as they are now, they stretch too much.

Ok, i promised a giveaway. I don't have any pictures because my mom moved the fabric somewhere, and I couldn't find it before we left. But I have two Ukrainian fabrics to giveaway to one lucky person. 
If I remember correctly they are the same or similar to what I gave away in December. To enter leave a comment here with a way to contact you, and let me know what me made item would you bring on vacation. The giveaway ends August 2 at midnight CST. Until then happy sewing!
 

Tuesday, July 21, 2015

Summertime Sally

The problem I have with summer is that it brings out the lazy in me.  It's hot.  We don't have central air conditioning, so the apartment is never quite cool enough.  I end up sitting on the couch fuffing around on the internet or reading a book.  My sewing suffers immensely during the hottest months.  A couple of weeks ago, I got inspired to make a summer dress.  I wavered for two or three days on what pattern to make.  I even traced a Burda pattern, but when I went to cut it- I just couldn't imagine it.  I finally settled on a pattern I already cut out- the Sally Shirtdress.
For this version I used a rayon/vicose I picked up in Sao Paulo.  It was slightly sheer, so I underlined it with the cotton/silk batiste that I bought last month.  As you can tell it doesn't look a whole lot like the Sally Shirtdress.  After I sewed the collar and the sleeves, I tried it on.  The sleeves had zero ease built into them, so they were way too tight.  The collar didn't stay up.  It looked terrible.  Here is what it looked like with the collar (but without the sleeves):
I hated that the underlining showed.  So I picked up my seam ripper and unpicked the sleeves and collar.  Then I hung it up on the dressform and let it sit for a couple of days.  While it was sitting, I finished another pair of pants that I had set aside earlier as I wasn't happy with either.
I am still not sure about them, they're comfy and fit well in the back, but they look a little frumpy.  Anyway, back to the Sally Shirtdress.  I left off the collar, finished it with bias binding, but needed a new sleeve.  Something didn't take up too much fabric because I only had about a quarter yard left.  I flipped through my patterns and settled on the sleeves from Simplicity 1872 by Cynthia Rowley. 
The other change I made, was moving around pleats.  Instead of the four inch pleats (two inches above the waist and two inches below), I did pleats that were only a inch long.  This created the blousing effect I was after. There are six pleats in the back, but only four in the front.  Anyway, that is about all I have to say about this dress.  I wore it twice this weekend, and it was nice and cool each time.  I will say that after almost a year of being out of Brazil, it took me a little bit of getting use to wearing such a vibrant dress.  Anyway, I have almost finished a Gabriola skirt, so I better get on with it, so I can do one more post before I go on vacation.  Until next time, happy sewing!

Saturday, July 4, 2015

Happy Independence Day!

As we've been discussing the last couple of blog posts, I have been working hard on my Fourth of July Party outfit.  I finished in earlier this week, in time for the official party, which was on Thursday.  I wore it today as well, since it was really Independence Day, and I had another party to go to.  It garnered many compliments, and was super comfortable.  Which is a must since on Thursday, I was working outdoors for six hours in the rain and heat.

It could only be more patriotic if I had found the perfect red and white striped knit to make a jacket.  Next year...  Anyway, let's get to the nitty gritty, the button down is another McCalls 6649, with the yoke altered to come to the front and the darts turned into gathers.  The sleeves I took from a New Look pattern, 6078, I think.  Oh, and I also curved the corner of the collar.  Is it still really McCalls 6649, when there are so many changes?

A closer look at the blouse.  Look at all that gathering.  Instead of interfacing, I used an extra layer of the fabric in the collar, button placket, and sleeve band.  The buttons on the sleeve band are in the back, which is a little odd, but that's how it said to get them done.
I kinda like it though.  It gives a little bit of interest on the back of the blouse.  The fabric is a red cotton lawn that I got at the local fabric store.  It is a rather crisp hand for as thin as it is.  It makes a rather nice looking shirt right?  All the seams are french seams, so it looks just as nice on the inside as out.  I also used a lot of glue stick to make sure the plackets, bands, and collar were easy to topstitch.  As this is my fourth iteration of M6649, it came together without any issues.
On to the skirt.  I've previously talked about quilting the stars.  The rest of the skirt is deceptively simple.  It's a bunch of rectangles sewn together and then pleated.  I winged it on the pleating- they're three inch pleats that are six inches deep, but I think one ended up being five inches deep, and then the ones next to the zipper are random sizes too.  But it fits and that is what matters.
 
Here is a look at the inside.  It is not lined, but finished with a facing on the top and at the hem.  The hem facing is something like 10 inches deep.  It covers all the raw edges though, which is what is important.   I used red bias binding to finish the edge facings, and then slip stitched them down.  I like the look of the stripes and might use it for another skirt.
 A closer look at the stars.  There are thirteen of them, one for each original colony of the United States.  On a side note, the Betsy Ross flag is my favorite of all the flags.  So much so, that I have a framed copy of it hanging as artwork.  Makes a great background for a patriotic outfit right?
About a month ago a new mural popped up by my apartment, which is what we used as a background for the photo shoot.  Here is a look at the actual full painting.  I am tiny compared to it.
There are a couple other ones near by that are really cool too.  I should get around to taking my camera so I can show you those as well. Anyway, next up on my plate is my dear husband's leather jacket.  The pattern making for menswear book came, so I have no excuse!  On that note, Happy Independence Day and Happy Sewing!