Saturday, May 23, 2015

Wardrobe Challenge Finally Wrapped Up

So I never did the final post for the wardrobe challenge here.  I did on Pattern Review, and within the deadline, so it's in the contest.  By the time I finished that review and my evaluation (due on the same day), I had no energy left for writing.  Nor apparently did I for sewing.  In the last couple of weeks, I have sewn very little, so nothing to show you.  I have, finally, reorganized my notions, and am almost finished cleaning my sewing room.  This is a necessity, as it doubles as our guest room and our first guests are coming in a couple of weeks!  I have also spent more hours than necessary dealing with Adobe customer service.  Luckily, I have resolved the issue with my Creative Cloud subscription, but am still considering alternatives to the company, as it took me five separate calls to get the problem fixed.  Anyway-  here is my final wardrobe:


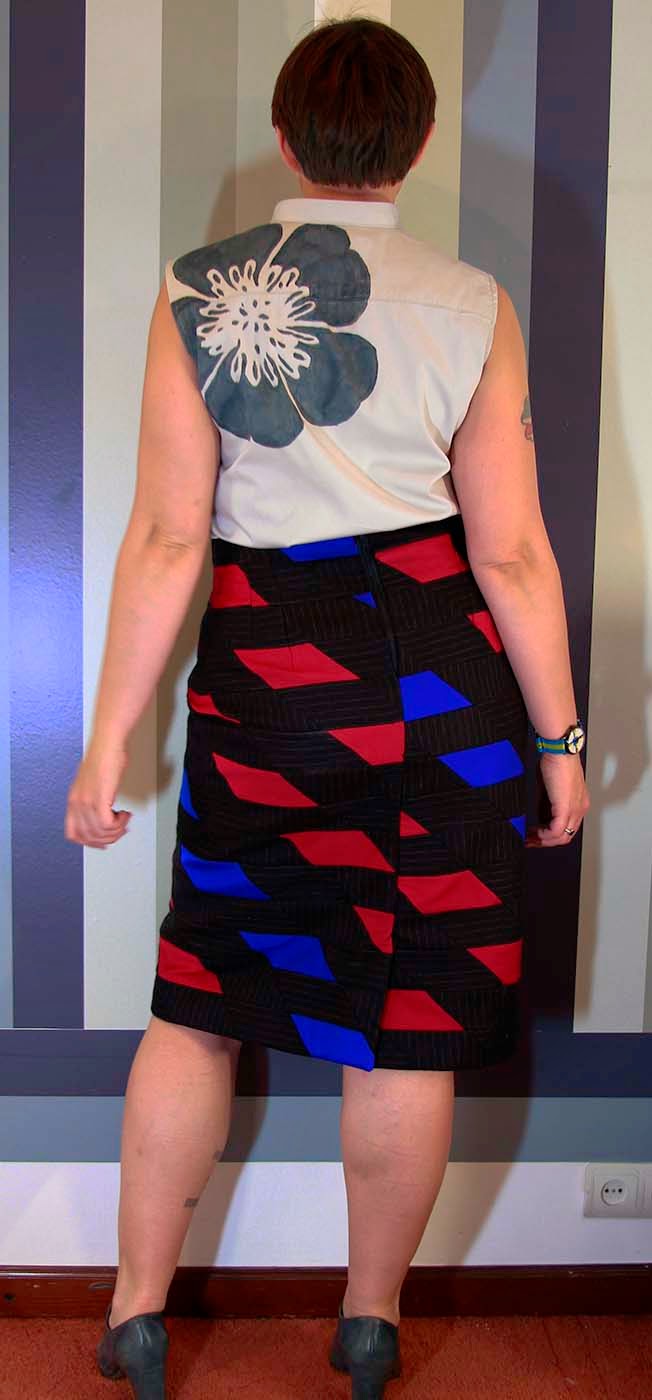
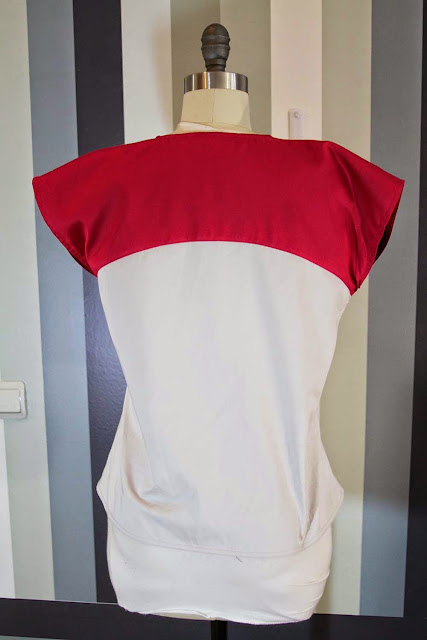
The full review is here at Pattern Review.  I can't decide which is my favorite piece.  Most worn are my Ginger jeans, followed closely by the moto jacket.  I love having more tops to work with, especially since three of them are somewhat plain so they can be paired with patterned bottoms.  The skirts really are statement pieces.   They are really fun to wear.

Anyway, I don't think I'll win the contest, there are tons of amazing entries.  You can see them all here.  If you are a member of Pattern Review (and have been one for 90 days) you can still vote for another 36 hours.  Anyway, back to organizing!  Mainly so I can figure out what happened to a pattern piece I have been searching for.  I am almost done with a pair of summer trousers, and want to make a matching summer blazer.  Hopefully I can get some sewing done on them this weekend.  Until next time, Happy Sewing!

P.S.  Do you guys read xoJane?  I usually post a picture on their outfit of the week post, and this week they featured my dress.  You can totally see it here.

Thursday, May 14, 2015

The Week of the Wardrobe Challenge: Final Piece Simplicity 1755

As the week has been moving on, I have been feeling the itch to sew something new.  Ideas are fermenting.  It doesn't help that I picked up Burda's May issue, I indulge every once in awhile as it is all of 30 hryvnia or $1.50.  But I must finish my posts for the Wardrobe Challenge on Pattern Review.  Many collections have been posted, you can see my stiff competition here.  So let's get to it, as I need to make my collages!  My final piece in my wardrobe is Simplicity 1755 a shirt dress designed by Leanne Marshall (of Project Runway fame).  It's got some interesting features such as raglan sleeves and no buttons.  Might as well take a look!
I used a cotton print I picked up over Christmas in Kansas.  I made a size 14 with a half in full bust adjustment, and no other alterations to the pattern.  I didn't bother to use the skirt pattern as it was a gathered skirt.  The seams are either french seams or turned under and sewn.
As I only had three yards of fabric, I didn't bother with print matching.  But I don't think it's noticeable, nor could I have figured out where to match it.  What you cannot see back there is the invisible zipper.  It took me a couple of tries, as it kept on wanting to shift, but it might be my best insertion yet!
The pattern calls for a tie belt, but I opted to make a fabric covered belt.  I have two widths of belting, one or two inch.  The belt buckle, though, called for an inch and a half.  What's a girl to do?  I cut the two inch belting to one and half inches and called it a day.  It goes well with the jeans too.  Here it is with my jacket.
There isn't really much to say about this dress, there wasn't anything special about the construction.  It came together super quickly and easily.  It will be a great dress for this summer, as it's light and breezy, without looking unprofessional.  Anyway, I am off to put together my collages for the big finale.  I need a name for my collection, any suggestions?  Until tomorrow, happy sewing!

Wednesday, May 13, 2015

Week of the Wardrobe Challenge: Top 4, Make Your Own Print

For top number four, I decided to make my own print.  Way back in August 2014, I was shopping for the umpteenth time on my vacation at JoAnns, when I came across an interesting idea.  Photo-dying ink.  The brand is named Lumi, and the theory is that you can print out large negatives on your printer, spread this ink on your natural fabric (I think their target was t-shirts), take it outside for 15-30 minutes depending on weather, and it will develop like an old fashioned photograph.
To a photography minor, who spent days in the darkroom throughout high school and college, this totally convinced me to buy it.  Then it sat in a drawer for seven months.  We live on the 7th floor, and I couldn't wrap my head around how to maneuver it.  Well, this wardrobe challenge really kicked me into gear. 
About the same time, I came across this JCrew picture, and the idea of a giant statement flower on a piece of clothing was planted.  I even found a clip art to work from.  So using principles of photography- where you want it white you need something solid blocking the light, I printed out my giant flower on the largest piece of photopaper I own, 13"x19", and then since I am not awesome with an exacto, I printed out the center part onto the negative paper Lumi provided.  This is where I think I went wrong. Or one of the place I went wrong.
I set it all up, and got my older son to help me out.  I shut all the curtains and then started painting the ink on the shirt pieces.  If you look at the picture above you can see that in order to do this I had to un-tape my precisely taped negatives and then re-tape them in the dark.  Once everything was painted and taped down.  We quickly, but super carefully, ran to the elevator and took them outside.  The sun was working in our favor, so we could hang out in the driveway.  But the wind was not.   The wind blew up the negative portion several times, causing some development in places it should have been white.  Once our time was up, we ran upstairs to the bathroom, where I had a bucket of the fixative wash waiting.  I was worried that since our washer is front load, the time it took for the fixative wash to get to the fabrics, it would develop more.  So I dunked and then tossed into the washer.
This is what I ended up with.  The negative was printed on the wrong side for this one, so it created a marbled effect, and you could see where the negative was placed.  No good!  
So I took out my trusty lumiere fabric paints and started messing around.  I couldn't get a consistent color on the first try, so I added some other dyes I own, and some cheap-o Brazilian fabric paint.  This meant I had to recut and redo.  Luckily, I had just enough fabric to do this.  So I cut and traced and painted.  For the lumiere paints, you have to heat set with an iron for 3 minutes.  For the other dyes, it's a steam process.  Since I wanted to make sure nothing moved, I did both.  I spent over thirty minutes ironing my two flowers and then tossed it in the dryer with a damp towel.  Of course, I was worried about the wet towel messing it up, so I put the fabric pieces in my dryel bag with the zipper opened just a bit.  By now, I'm sure you're dying to know how it turned out:
 For the shirt, I used McCalls M6649 as the base for the shirt.  As the flower was right where the dart should be, I decided to rotate it to the shoulder and make gathers instead.  I also moved the shoulder seam two inches to the front.  I didn't have enough for sleeves, so I made it sleeveless.  Ha!  I guess you can't see with such a close up, all the changes I made.  (Oh yeah, I also decided just a mandarin collar.)
And where did the second flower go?
The flowers aren't as big as the JCrew inspiration, but I think it still looks alright.  It goes pretty well with the rest of my wardrobe.  The fabric is the same gray as top number three.  It has a similar shoulder seam placement, gathering, and flower to top number one, the Arielle blouse. Now, let's see how it goes with the rest of the wardrobe.


Not to shabby eh?  I will likely try the Lumi photo inks again.  I think it's a neat idea.  It would be easier to do in a controlled darkroom environment.  What do you think?  Have you ever used Lumi before?  How about painting your own fabric prints?  Anyway, off to write my review on PR, so until tomorrow Happy Sewing!

Tuesday, May 12, 2015

Week of the Wardrobe Challenge: Top # 3 or yet another Bellini

Welcome to night two of the week of the wardrobe challenge posts.  As I mentioned last night, I wasn't thrilled with how my plaid Bellini went with my pink/blue/pinstripe skirt, so I had to rethink the top.  Here is a visual reminder of what it looked like.  Awesome top, I've worn it weekly since I made it, but it's too warm for the rest of the wardrobe.


I broke down and bought half a yard of pink cotton lawn from my local fabric store.  And by local, I mean one of the five stores that is a block from my house.  Temptation, such temptation.  For the bottom, I used a gray shirting from my stash.  This gray shirting will also be featured in tomorrow's top three.  I decided to try color blocking.  As the pinks didn't match 100% that meant pink on top and gray on bottom.  The weights of the fabric were also different, so I interfaced the pink with fusible black interfacing.  I chose black, as it got the pink slightly closer to the pink in the skirt.

Much better right?  I hope so, but if you think differently, let me know in the comments. Let's take a closer look at it, it's the same pattern as the first Bellini, but the top piece was cut on the straight grain, not bias this time.  The neck and hem are finished with bias binding, and the sleeves are folded over twice.  The side seams are french seams, but the seams between the top and bottom are serged.  Mainly because I f'd up and sewed it right sides together instead of wrong sides together for the french seam.  Ooops!  You can't tell though, and that's what matter, right?
I stopped the buttons right underneath the curve, so I wouldn't have to switch threads or buttons.  It doesn't flap open, nor would I have buttoned to the top anyway.  So enough blabbering, and let's see how it fits into the wardrobe:
With my Ginger jeans

+Ginger Jeans and my motojacket

+ Chevron quilted skirt

+Chevron quilted skirt and motojacket

+pink/blue/pinstripe quilted skirt and motojacket.

 In my opinion, it's a much better fit into the wardrobe than the plaid version.  Not that I don't love the plaid version, and it looks amazing with 2/3s of the bottoms, but this is better.  That's it for tonight, tomorrow is top four, which I think you will like.  Until then, happy sewing!

Monday, May 11, 2015

A Week of Wardrobe Challenge- Bottom number 3

Hi there!  Sorry about the radio-silence.  I have been manically sewing over the last couple of weeks to finish this wardrobe challenge for Pattern Review.  Since we last spoke, I made two more tops, a skirt, a dress, and a belt.  That's a lot to talk about, so I figured since I need a break from sewing, I'll spend the week blogging.  One piece of clothing a day, culminating with the entire wardrobe on Friday.  (Friday is the 15th, the deadline for the entering the contest, so everything must be done by then.)  I was going to blog in order of making, but I decided to skip ahead to my last skirt.  Originally, this was going to be the Gabriola skirt by Sewaholic in a beautiful blue suiting, but I figured I needed something more cohesive with the collect- also why there is another top in the mix,  if we're being honest, the blue plaid one did not really go with my first quilted skirt.  First you say?  Yes that is right, I made a second quilted skirt.  This time in denim.
Three hundred and sixty squares of denim to be exact.  I used the leftover denim from my Ginger jeans, and then a little bit of my new denim that I received for more Ginger jeans (the Ginger Jeans kit from Cone Mill denim).  As I wanted the gradation, I used the right side of the denim I bought here, then the wrong side of it, then the wrong side of the blue Cone Mills and finally the wrong side of the black Cone Mills.
Chevron!  Each square was 2.5 inches by 2.5 inches.  Which then was sewn in the pattern.  If you're in the Stashbusting 2015 facebook group, you probably saw my pattern sheet.  I used graph paper, and it really helped, in a. making sure I didn't over or under cut squares, and b. I didn't have to really think about the pattern.
Apparently my ass is just the right size for the patter to perfectly match on the back. I did not plan for this at all.  But looks pretty awesome right?  For the skirt, it's the same pattern as for my first quilted skirt, except that the side dart was broken into two smaller darts so I didn't lose any squares.  I also used a double sided zipper (is this what it's called?) instead of a vent.  
You can see here, why I didn't want to lose a single square, it would have looked funny without that one medium colored one on the top row.  Let's see, other construction notes.  I serged every seam.  Big mistake.  While this skirt will not fall apart every, it's somewhat uncomfortable to sit in for long stretches of time.  Think grid pattern.  My machine also hated it.  I've never broken so many needles.  Fortuitously, I double ordered denim needles, so I should have enough for my next two pairs of Gingers.


I used some midweight jersey as a facing, to keep the bulk down, but also allow for the denim to stretch.  As the fabric is thicker than the suiting I used for the last skirt, it's a bit more snug.  I'm sure you're wondering how the skirt looks with the rest of the wardrobe. 


You have to wait tomorrow to see it with one of the other tops, and then Wednesday for the other top.  Patience my dear readers!  Up next, is the replacement for the plaid top.  Until then Happy Sewing!  Oh yes, in case you're wondering, I chopped my hair off yesterday.  It's been driving me nuts for awhile, as I don't like to wear it down, but when I put it up I get headaches.  So pixie cut for me!