For top number four, I decided to make my own print. Way back in August 2014, I was shopping for the umpteenth time on my vacation at JoAnns, when I came across an interesting idea. Photo-dying ink. The brand is named Lumi, and the theory is that you can print out large negatives on your printer, spread this ink on your natural fabric (I think their target was t-shirts), take it outside for 15-30 minutes depending on weather, and it will develop like an old fashioned photograph.
 To a photography minor, who spent days in the darkroom throughout high school and college, this totally convinced me to buy it. Then it sat in a drawer for seven months. We live on the 7th floor, and I couldn't wrap my head around how to maneuver it. Well, this wardrobe challenge really kicked me into gear.
 About the same time, I came across this JCrew picture, and the idea of a giant statement flower on a piece of clothing was planted. I even found a clip art to work from. So using principles of photography- where you want it white you need something solid blocking the light, I printed out my giant flower on the largest piece of photopaper I own, 13"x19", and then since I am not awesome with an exacto, I printed out the center part onto the negative paper Lumi provided. This is where I think I went wrong. Or one of the place I went wrong.
 I set it all up, and got my older son to help me out. I shut all the curtains and then started painting the ink on the shirt pieces. If you look at the picture above you can see that in order to do this I had to un-tape my precisely taped negatives and then re-tape them in the dark. Once everything was painted and taped down. We quickly, but super carefully, ran to the elevator and took them outside. The sun was working in our favor, so we could hang out in the driveway. But the wind was not. The wind blew up the negative portion several times, causing some development in places it should have been white. Once our time was up, we ran upstairs to the bathroom, where I had a bucket of the fixative wash waiting. I was worried that since our washer is front load, the time it took for the fixative wash to get to the fabrics, it would develop more. So I dunked and then tossed into the washer.


This is what I ended up with. The negative was printed on the wrong side for this one, so it created a marbled effect, and you could see where the negative was placed. No good!

So I took out my trusty lumiere fabric paints and started messing around. I couldn't get a consistent color on the first try, so I added some other dyes I own, and some cheap-o Brazilian fabric paint. This meant I had to recut and redo. Luckily, I had just enough fabric to do this. So I cut and traced and painted. For the lumiere paints, you have to heat set with an iron for 3 minutes. For the other dyes, it's a steam process. Since I wanted to make sure nothing moved, I did both. I spent over thirty minutes ironing my two flowers and then tossed it in the dryer with a damp towel. Of course, I was worried about the wet towel messing it up, so I put the fabric pieces in my dryel bag with the zipper opened just a bit. By now, I'm sure you're dying to know how it turned out:

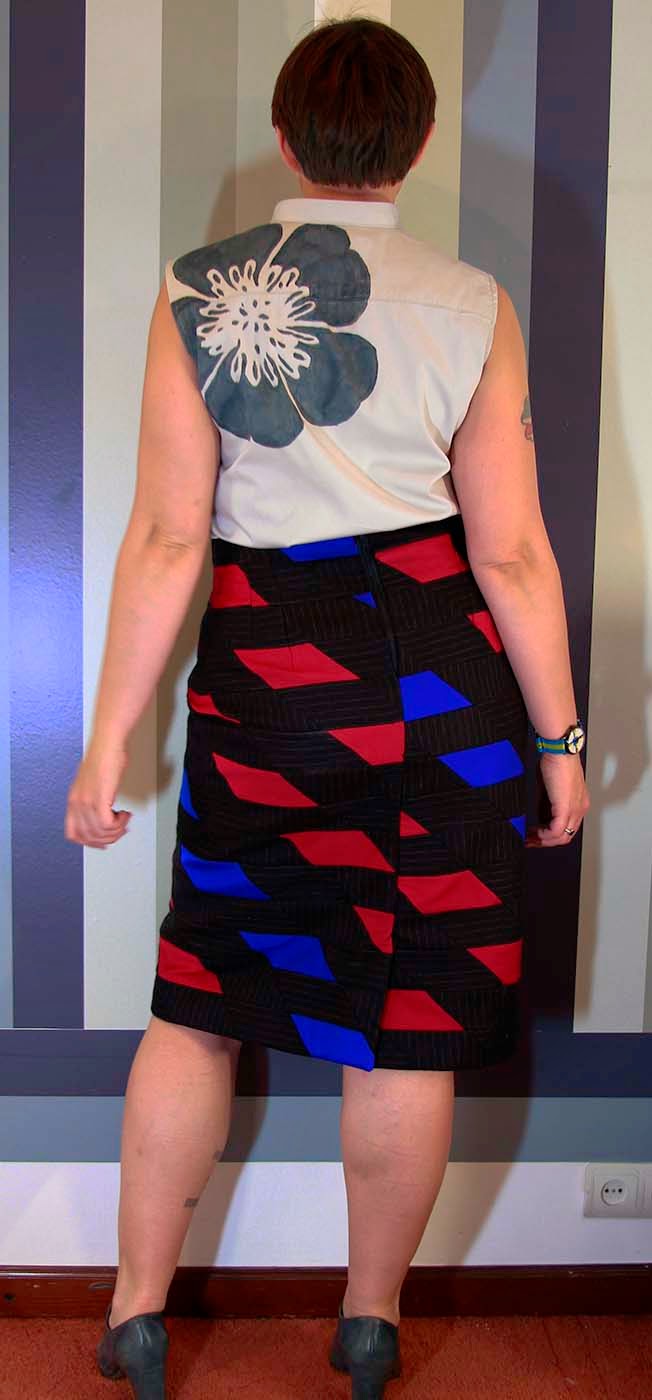
For the shirt, I used McCalls M6649 as the base for the shirt. As the flower was right where the dart should be, I decided to rotate it to the shoulder and make gathers instead. I also moved the shoulder seam two inches to the front. I didn't have enough for sleeves, so I made it sleeveless. Ha! I guess you can't see with such a close up, all the changes I made. (Oh yeah, I also decided just a mandarin collar.)

And where did the second flower go?

The flowers aren't as big as the JCrew inspiration, but I think it still looks alright. It goes pretty well with the rest of my wardrobe. The fabric is the same gray as top number three. It has a similar shoulder seam placement, gathering, and flower to top number one, the Arielle blouse. Now, let's see how it goes with the rest of the wardrobe.


Not to shabby eh? I will likely try the Lumi photo inks again. I think it's a neat idea. It would be easier to do in a controlled darkroom environment. What do you think? Have you ever used Lumi before? How about painting your own fabric prints? Anyway, off to write my review on PR, so until tomorrow Happy Sewing!
Your top looks great! It makes me want to give fabric painting a try! And your blue and pink skirt turned out wonderfully!
ReplyDelete