Thursday, April 9, 2015

The Wardrobe Challenge First Outfit

Hey there, so it's been a bit, right?  I've been really busy, but wanted to wait on blogging until I had both a top and a bottom.  When we left off, I was just about to start working on my wardrobe for Pattern Review's Wardrobe Contest.  Nine pieces- four tops, three bottoms, and two sewist's choice, one of which could be either ready to wear or presewn.  All done within six weeks.  Well, ladies, I am officially a third of the way through.  And in nine days... giving me four weeks and five days to make the rest.  It's still going to be tight.  We'll let's get to it:
Don't worry, I moved the button over a tiny bit so the zipper doesn't show.
 It's my new Deer and Doe Arielle blouse, Ginger Jeans (wearable muslin), and of course the moto jacket, which I wear every damn day now.  I love my jacket.  It's probably the favorite thing I made.  Well, we've already discussed the jacket in depth.  It's going to be my already sewn sewist's choice.  I may still swap it out for the pink blazer, but I'll wait until all the pieces are made to decide.  But let's look closer at the top and jeans.

This was my inspiration sketch.  Slightly fortiesh, easy to wear, and most of all comfy.


Pretty spot on to the sketch right?  (Well, if you squash the sketch a little bit.)  None of my pictures turned out really well.  Either the lighting was uneven, or the kiddo wasn't paying attention, or I wasn't.  I think in most of them, my eyes are shut.  Oooops!
Here is the obligatory view from the back.  So let's start with the top.  As I've said it's Deer and Doe's Arielle blouse.  I made it without the collar.  I also deepened the v-neck by an inch give or take, tapering to a half inch at the shoulder.  I used a cotton- likely voile for the outer fabric and then lined it with batiste. (I did this to get the clean finish at the neckline, only to try it on and feel like I was in scrubs.)  I then finished the new neckline with biase binding.  I would have removed the batiste, but I attached it also at the shoulders in the french seams. 
It now doesn't look like scrubs.  The only other change I made was to not do the front darts.  I am still debating on whether to go back and put them in.  What do you think?  Oh and I made a straight size 42.  It was a fairly quick sew up, and a nice palate cleanser.  And now, for the main event- my first pair of likely many, Ginger Jeans.
See fixed button!  And it fixes the slight gaping I thought I had in the back
So let's talk jeans.  I am still patiently waiting for my lovely Cone Mill denim kits from Closet Case Files.  When are they shipping?  I am having a hard time waiting!  So much that I broke down on Saturday and bought denim.  It's not the best quality, but it was the only stretch denim at the fabric store I was at.  The plus side- I paid 300 hryvnia for 2.5 yards and have 1.25 yards left.  Meaning these jeans cost me roughly $6.00 as I had everything else my stash. 
Let's start with the obvious.  I made a mishmash between view A and view B.  I loved the high waist but need straight legs.  I used view B from the top to the hip and then view A downwards.  It worked pretty well.  I also had some serious grading to do as looking at the sizing, I was a 14 at the hips and closer to a 10 at the waist.  For the back, I graded the yoke from a 10 at the waist to a 12 at the upper hip and then from a 12 to a 14 on the lower jean piece.  As my extra weight is in the front, I went from a 12 in the waist to a 14 in the hips.  Pretty spot on in fitting right?  I also moved the pockets up a half inch.  In my next go around I'll move them up maybe a quarter inch more.

My biggest complaint, is that I thought the rise would be higher?  The pattern says one inch above the natural waist.  Mine sit slightly below my natural waist.  And I always thought that I was short waisted, so I found that odd. When I make them again, I'll raise the front rise that inch, so I can have truly high waisted jeans.  But other than that they are the most comfortable jeans I've ever put on, and I don't have to worry about back gaping or them sliding down.


Anyway, on to more sewing, and lugging around my tripod so that I can get the better photos.  I also need to get a light reflector to help with the indoor photos.  Until next time, happy sewing!  Oh I totally forgot.  My new glasses finally showed up.  I still need to get them fitted (as my ears are crooked making them crooked), but what do you think?
Awesome right?

Tuesday, March 31, 2015

New Jacket

March really was the month of jackets.  I completed my third and final one- a mishmash of a pattern from Moldecia (a Brazilian pattern magazine ala Burda) and Butterick 6104.  Here is the final result:
 It pretty much turned out how I imagined it while sketching a couple of weeks ago.  Here is the original idea.  Do you keep sketch books in random places?  Do you sketch ideas for sewing?
I knew that I didn't have a paper pattern for this, so I turned to my fairly extensive collection of pattern magazines.  I buy them with zeal, but never use them!  I really need to rectify that, because there are some awesome patterns out there.  So I found a base for the body + sleeves in a Brazilian one, called Moldecia.
One thing to note with Brazilian pattern magazines, is most of the patterns come in one size.  Luckily, the jacket was presumably in that size.  I didn't know for sure, since for whatever reason, Moldecia only printed the larger size measurements- so starting with a 44. This plus mashing the patterns together meant I needed to do a muslin.  The Moldecia pattern had the right style lines in the body, plus added ones on the sleeves.  But there was no peplum and the collar was wrong.

Enter Butterick 6104, which had the right collar and the right peplum.  The muslin was pretty straight forward with only a couple of alterations- lengthen the peplum by 2 inches, take in the body waist by 2.5 inches, and the original neckline with the collar was way too snug, so I widened it by 5/8ths of an inch on each side.

Line Art 

Now that I've bored you with the technical details of designing the coat, let's look at it again.
Even with the hiccups of sewing the front panels in backwards, it was pretty easy to put together.  The one thing that I would have changed if I really thought about it, would be to have the zipper go all the way to the bottom.  It's fine as is, but kind of a pain to get started.  Here it is from the back and side.  It looks like I could take a smidge out of the back, but it's not too bad.
 Now let's take a look at the quilting detail.  It's not truly quilted, as in I didn't use batting underneath, but some cotton sateen.  I am really trying not to spend much money on my sewing, as I really don't need too. 


Quilting took forever!  Hours and hours of it.  I did as much of it as I could before constructing it, as I figured it would be easier in the flat.  I learned a lot about sewing in a straight line.  I used up some cotton satin (at least that's what I think it is) for the lining.  You may remember it from my bomber jacket.


All in all, I love this jacket.  It's a great spring/fall jacket for Kyiv and for work, as it's a bit nicer than my bomber jacket.  Anyway, it's now April, and I've decided to try and enter the Pattern Review Wardrobe contest, which means sewing 8 items in the next 6 weeks.  I sketched my ideas out, and cannot wait to get started.

What do you think?  Everything will be sewn from stash fabrics, minus the Ginger jeans which hopefully will be sewn with the kit fabrics, but I don't know when in April the kit will be shipped, and so I might have to buy some denim her in Kyiv.  Here are the fabric choices.  And with that, it's time to get ready for work.  Until next time happy sewing.

Wednesday, March 25, 2015

Sewing While Sick...

As much as you want to, when you have a head/chest cold, it's best to stay out of the sewing room.  Because otherwise this might happen:
I'm sure you're scratching your head and wondering what I'm talking about.  Well two of the wool panels have the wrong side of the wool on the outside.  I can't decide how much it's going to bother me yet, because I only noticed it when:
I finished quilting all the leather panels, so it's not easily fixable.  My mistake for you guys to learn from!  The blue will also be quilted the same way, so readers, the question is- do I fix it? Or just hopefully forget about it? Let me know in the comments. 
P.S. I used the lining fabric to quilt- as I am working through that stash.  Luckily there was just enough to cut out both the lining and the quilting.  Hopefully it will be awesome when it's done.  Now it's time to slap on some Vick's Vaporub and try and sleep off this cold.  Until next time, happy sewing.

Thursday, March 19, 2015

Finished Jacket! Burda 7212

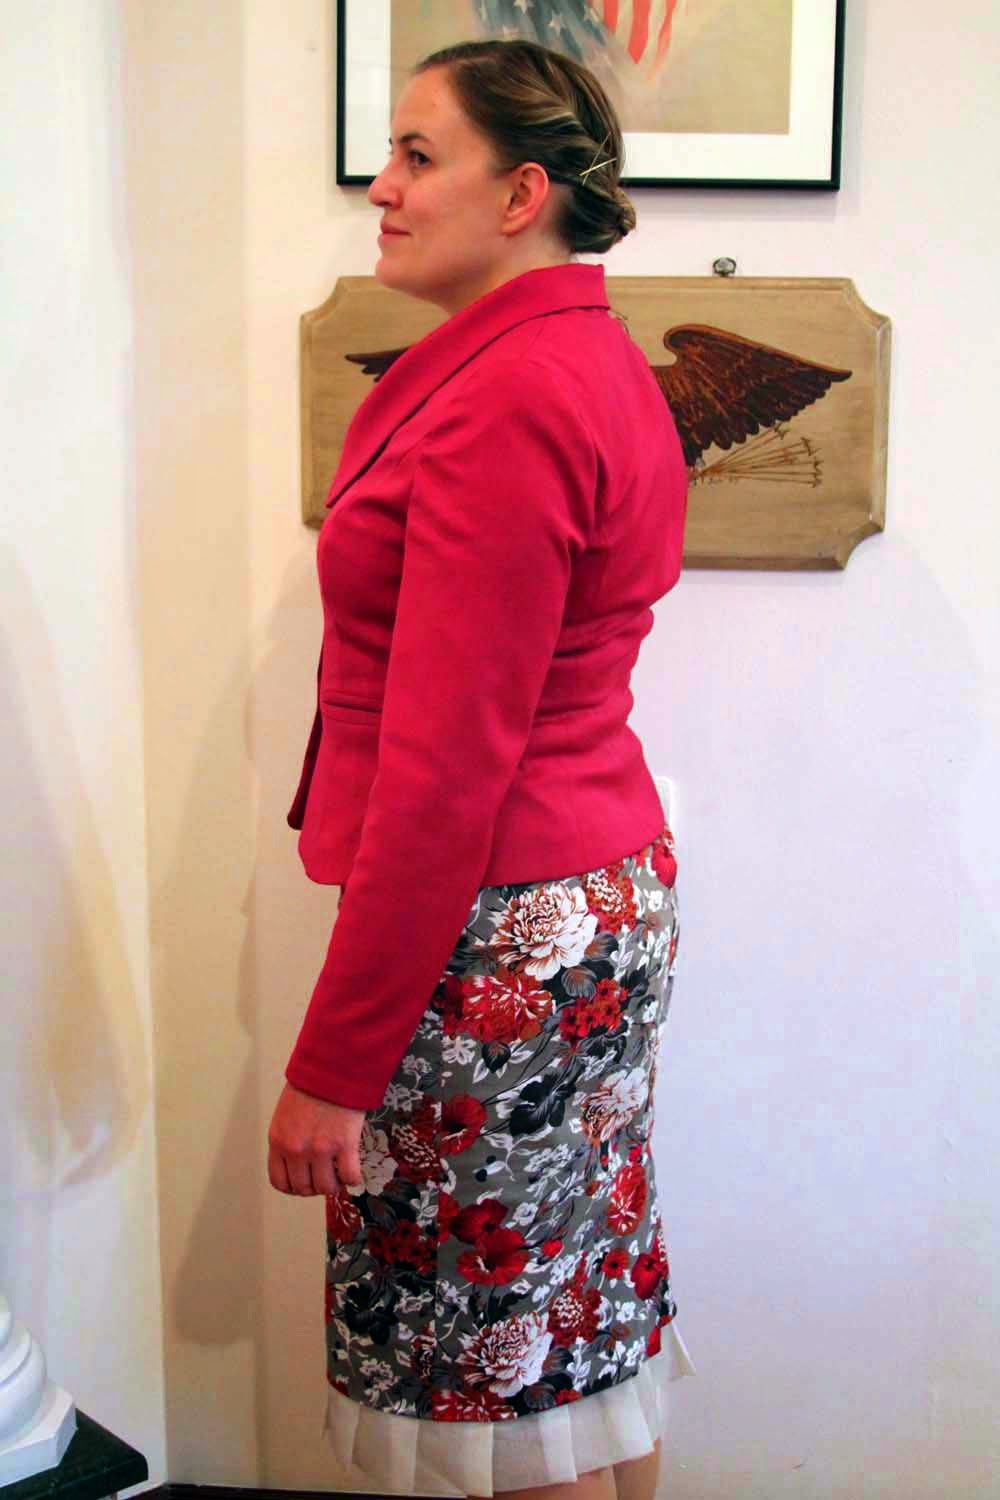
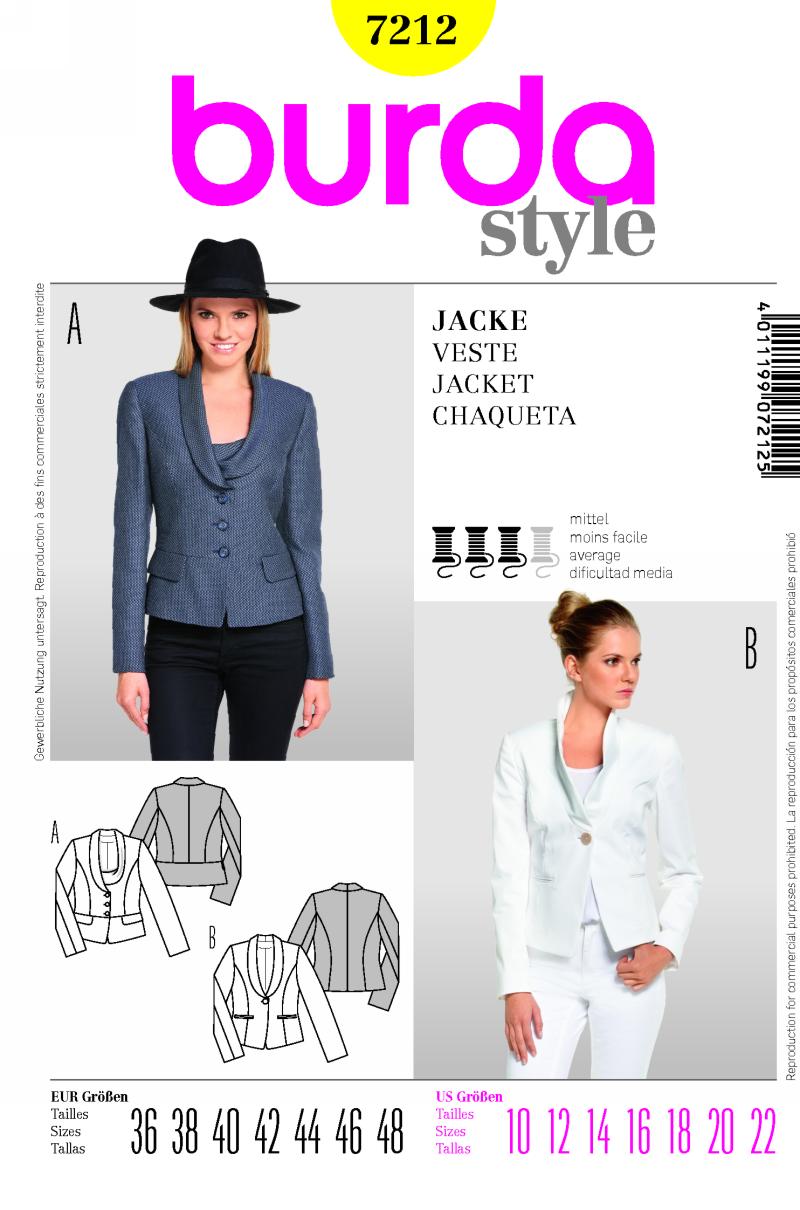
Readers, I am going to keep this post short and sweet.  I finished Burda 7212, version A mixed with version B, altered to not have linebacker shoulders and to not have a gap at the hips.  I don't have much to say about it.  Except, this may be my absolute favorite think that I have ever made in my entire sewing history.  I loooooooove it!  It was pretty much a dream to make and it's amazing to wear.  Without further ado-
This picture was taken after a full day's worth of wear, so it needs a slight pressing, but look at that color!  A coworker said it looked good enough to eat- like a raspberry.  What do you think?  It is a Super 120 wool from Valentino.  It was very lightweight and drapey, so I interfaced the entire jacket with tricot interfacing.  I didn't have enough of the black, so for the under sleeves and facings I used white.  It changed the depth of the pink ever so slightly.
Let's get into the details.  I combined the view A collar with the view B no peplum.  I made a size 38, with an giant 1.25 inches taken out at the shoulders.  I added about 4 inches at the hips, so that the front would lay flat.  I sewed the side, sleeve, and princess seams at 1/2 inch, but the rest at 5/8ths inch.  I drafted facings for the hem and the sleeves, as I think the make a cleaner jacket. 
The lining is likely a poly charmeuse bout in Sao Paulo for about $3.  I used grey/lavender biased binding to finish facing edges.  I also used it as piping between the front facing and the lining. 
I used a piece of the selvage to make a hanger.  I thought about using the piece that said Valentino or made in Italy, but I thought this was better.
For the buttons, I used mother of pearl buttons from a necklace that a friend gifted me.  I did make the welt pockets, if I were to make this again, I would make them thinner.  They're a little oversized for my tastes.

Anyway, that's that, I'll leave you with some more pictures.  Now to decide on my next make- should I move onto a wool/leather moto jacket, or should I make a shirt dress?  And oooh, wouldn't this jacket look good with my hot air balloon dress.  Pink with white and blue.  Next week!  Anyway, until next time happy sewing.


Saturday, March 14, 2015

A Fall Outfit in Spring

Now it would seem that I can't seem to sew with the weather, but it all makes sense in my mind.  In Kyiv, we had about a week of spring, and now we're back into fall-like weather.  In the 40s(single digits for those who only know Celsius) and dreary. So it would seem it's a weather appropriate outfit right?  Let's get to the sewing- the jacket is Burda 7212, a mash between view B (lapels, no peplum) and view A (buttons).  I made a size 38 with the side seams sewed at 1/2 inch, and a giant wedge taken out of the shoulders.  Looking at the photos, you can tell that the shoulders are very line-backery.  Right?  The wedge was 1.25 inches- a little over 3 centimeters.
 
As I mentioned in my previous post, this is a wearable muslin, so no interfacing was used in the sewing of this jacket.  It shows.  The fabric is a double sided wool from Turkey.  It's kind of a mix between brown/black/green.
It is also the tiniest bit snug in the waist.  I am going to sew the front princess seams at 1/2 instead of 5/8s of an inch and the back princess seams will start as 5/8s and taper down to 1/2.  This should take care of the snugness.  For once though, the sleeves are a. the right length, and b. not ginormous.  The shoulders are pretty perfect.
 A view from the back, where you can tell that I sewed the lining too tight.  One of the major changes I am making to the super lovely jacket, is that I will be using facing for all the hems.  It should make a difference in how it sits, right?  And now for the second part of the sewing. The button down.  I used McCalls 6649 by Laura Ashley.  I think it's the size 12 with the d cup and without the front darts.  I don't know for sure, as I didn't mark the size on the tracing of the pattern. 
The fabric is a super lightweight cotton from one of my fabric buying sprees.  I got it in a great fabric store in Lawrence, KS.  It's probably where I'll spend my $100 allotted for that vacation this summer.  As it was super lightweight, I didn't want to use regular interfacing, as I felt it would be too thick and heavy, so I used a lightweight white cotton batiste, from the scraps of my hot air balloon dress.  I think it would look better with higher waisted jeans.  Where are you Ginger jeans kits?  The jeans I am wearing are Eddie Baur, not my favorite, but they pretty much what I have right now.
For the construction, I halfway followed Sewaholics tips on collar making, but I like to make the collar and collar stand and then attach the whole thing together.
 The back actually does fit well, I was wearing a tank top underneath, and the cottons kept on sticking together.  I was worried that it would be too shear.  I realized halfway through the day that I forgot to sew on the last button!  That's what I get for finishing an outfit before work.
My options for pictures were limited this time around because over half of them the collar of the jacket was up.  My lovely husband didn't bother to tell me to fix it.  Ooops!  Anyway, this is what I've been working on.  I have cut out my next version, which will have the asymmetrical collar, and be the loveliest shade of hot pink.  And one of the most expensive fabrics I've worked with, but it's lovely.  It's a super 120s wool from Valentino, it has a little bit of stretch, so I'll be interfacing it with tricot fusible.  I have a perfect lining for it, but it doesn't have any stretch.  Do you think I should buy another lining for it, or just use what I've got and sew the seams at 3/8ths inch?  While you think about it, here's a picture of the statue- I have no idea who Zhambil Zhabaev is, but his statue is right across from my work in the park.  I need to learn more about Ukrainian history!  Happy Sewing.